Thursday, October 14, 2010

Bakery Breads Made Easy

In this week’s cooking class we made artisan breads and pizza from a no-knead dough.  I first learned of this technique from the book, “Artisan Bread in Five Minutes a Day” by Jeff Hertzberg and Zoë Francois.  I checked it out from the library and loved the simple and delicious breads in it, but didn’t bake them very often because I don’t like using white flour.  Lucky for me, their second book came out last year, called “Healthy Bread in Five Minutes a Day.  I love this book!  All of the recipes used for the cooking class came from this book, but there are other cookbooks out there with similar bread-making techniques.  Look for “Kneadlessly Simple” or “My Bread” if you’d like to experiment further.  Here are some links to more information.  I’d especially recommend the tutorial video if you missed my class—it helps to watch someone (in this case, the authors of the book) mix and shape the dough.  All of the recipes that I made for the class are on this blog—just scroll down.  Happy baking!
Kneadlessly Simple Multigrain Bread
No-Knead Bread (from New York Times)
Artisan Bread in Five Minutes a Day
Artisan Bread Tutorial Video
No-Knead 100% Whole Wheat Bread

The Master Recipe

This is the recipe that I mixed together during class, and this a baguette made from the master dough.  I brushed the bread with egg, sprinkled with coarse salt, and then I poked cherry tomatoes into the dough before baking.  There are so many things you can make with this dough!  Leave me a comment and let me know what you made and how it turned out.

DSC05265

The Master Recipe

Makes enough for at least four 1-pound loaves.  Don’t be put off by the long instructions—the process is really simple.  Just read through them before beginning so you understand the timing.  From Healthy Bread in Five Minutes a Day by Jeff Hertzberg and Zoe Francois.

5 1/2 cups whole wheat flour
2 cups unbleached all-purpose flour
1 1/2 tablespoons granulated yeast (can decrease)
1 tablespoon Kosher salt
1/4 cup (4 tablespoons) vital wheat gluten
4 cups lukewarm water (about 100 degrees)
1 to 2 tablespoons of whole seed mixture for sprinkling on top: sesame, flaxseed, caraway, raw sunflower, poppy, etc.

  1. Mix all ingredients together in a large bowl (at least 5 quart) until flour is well combined.  The dough will be wet and won’t form into a ball, but if it seems too sticky, add a little more flour (1/4 c at most).  You’re finished when everything is uniformly moist, without dry patches. It takes a few minutes, and will yield a dough that is wet and loose enough to conform to the shape of its container.
  2. Allow to rise. Cover with lid (not airtight). Allow the mixture to rise at room temperature until it begins to collapse (or at least flattens on the top), approx 2 hours, depending on room temperature, and initial water temperature. Longer rising times, up to 5 hours, won’t harm the result.
  3. You can use a portion of the dough any time after this period. Fully refrigerated dough is less sticky and easier to work with than dough at room temperature.
  4. On Baking Day:
  5. Prepare your loaf pan, tray, or whatever you’re baking it in/on. Sprinkle the surface of your refrigerated dough with flour. Pull up and cut off a large grapefruit-size piece of dough (about 1 lb), using a serrated knife.
  6. Hold the mass of dough in your hands and add a little more flour as needed so it won’t stick to your hands. Gently stretch the surface of the dough around to the bottom on all 4 sides, rotating the ball a quarter-turn as you go. Most of the dusting flour will fall off – that’s fine, it isn’t meant to be incorporated. The bottom of the loaf may appear to be a collection of bunched ends, but it will sort itself out during resting and baking.
  7. The correctly shaped final product will be smooth and cohesive. The entire process should take no more than 30 – 60 seconds.   If you’d like a baguette, gently form and stretch the dough into an oblong shape.
  8. Rest the loaf and let it rise in the pan, on the tray/pizza peel, for about 40 minutes (if using fresh dough) or up to 90 minutes for refrigerated dough.  Depending on the age of the dough, you may not see much rise during this period. That’s fine, more rising will occur during baking.
  9. Twenty minutes before baking, preheat the oven to 450°F Place an empty broiler tray for holding water on any other shelf that won’t interfere with the rising bread.  (optional—makes a crisp crust)
  10. Dust the top of the loaf liberally with flour, which will allow the slashing knife to pass without sticking. Or, instead brush the dough with water or beaten egg and sprinkle with seeds.  Slash a quarter inch deep cross, diagonal lines, or tic-tac-toe pattern on top using a serrated knife.
  11. After a 20 min preheat you’re ready to bake, even though the oven thermometer won’t be at full temperature yet. Put your loaf in the oven (use a baking stone if you have one). Pour about 1 cup of hot water (from the tap) into the broiler tray and close the oven to trap the steam.
  12. Bake for about 30 minutes, or until the crust is nicely browned and firm to the touch.  Cool before slicing for best texture.
  13. Store the rest of the dough in the fridge in your lidded (not airtight) container and use it over the next 14 days. The flavor and texture improves, becoming like sourdough. Even 24 hours of storage improves the flavor.


If you can't set aside 2 hours for the bread rise, there is an option of letting it rise in the fridge during the day, too. Just take out your portion of bread dough, and place it on the parchment paper and let it rise in the fridge for at least 8 hours. Take it out when you get home, and let it rise to room temperature for at least 30 minutes and then bake it as directed.

Pumpkin Pie Brioche

I barely got to taste this—it disappeared fast.  (And then I burned the second loaf when I put it back in the oven for a few more minutes and forgot it was there!)  This bread has a different texture and crumb than the others I made for the bread class.  It’s an enriched dough (contains eggs and oil and honey) and the bread is soft and barely sweet.  I read in the book that the bread makes great French toast and the dough makes yummy doughnuts.  I can’t wait to experiment more with this recipe! pumpkin brioche 13 large
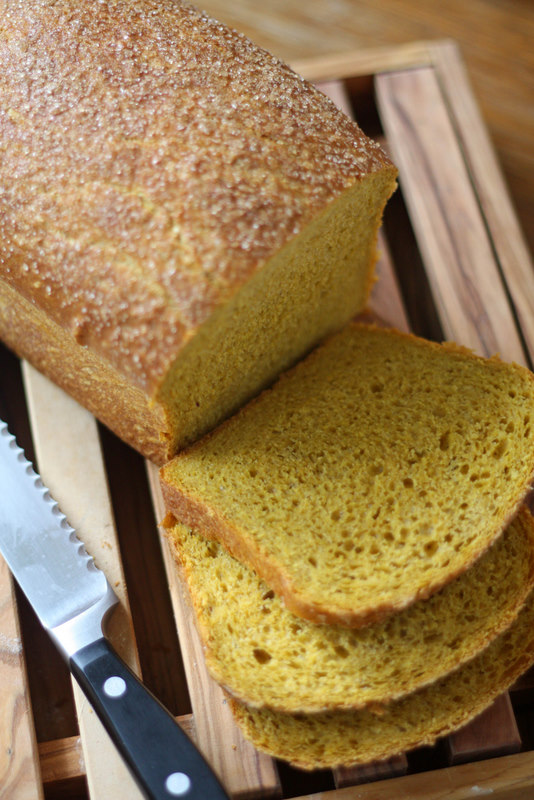
Pumpkin Pie Brioche Dough
from Healthy Bread In Five Minutes a Day
By Jeff Hertzberg, M.D., & Zoë François
Makes enough dough for at least two 2-pound loaves.
3 cups white whole wheat flour
4 1/2 cups unbleached all-purpose flour
1 1/2 tablespoons granulated yeast, or 2 packets
1 tablespoon kosher salt (increase or decrease to taste)
2 tablespoons vital wheat gluten
1 teaspoon ground cinnamon
1/2 teaspoon ground ginger
1/2 teaspoon ground nutmeg
1/4 teaspoon ground allspice
1 1/4 cups lukewarm water
4 large eggs
1/2 cup honey
3/4 cup neutral-flavored oil, or unsalted butter, melted, or zero trans fat, zero hydrogenated oil margarine, melted
1 15 ounce can pumpkin puree
  1. Whisk together the flours, yeast, salt, vital wheat gluten, and spices in a 5-quart bowl, or a lidded (not airtight) food container.
  2. Combine the liquid ingredients with the pumpkin puree and mix them with the dry ingredients without kneading, using a spoon, a 14-cup food processor (with dough attachment), or a heavy-duty stand mixer (with paddle). You might need to use wet hands to get the last bit of flour to incorporate if you’re not using a machine.
  3. The dough will be loose, but it will firm up when chilled. Don’t try to use it without chilling for at least 2 hours. You may notice lumps in the dough, but they will disappear in your finished products.
  4. Cover (not airtight), and allow the dough to rest at room temperature until it rises and collapses (or flattens on top), approximately 2 hours.
  5. Refrigerate the dough in a lidded (not airtight) container and use over the next 5 days. Beyond that, the dough stores well in the freezer for up to 2 weeks in an airtight container. Freeze it in 2-pound portions. When using frozen dough, thaw it in the refrigerator for 24 hours before use, then allow the usual rest/rise times.
  6. On baking day, grease a brioche pan or an 8 1/2 x 4 1/2-inch nonstick loaf pan. Dust the surface of the refrigerated dough with flour and cut off a 2-pound (cantaloupe-size) piece of dough. Dust the piece with more flour and quickly shape it into a ball. Place the ball in the prepared pan and allow to rest, loosely covered with plastic wrap, for 1 hour 45 minutes.
  7. Thirty minutes before baking time, preheat the oven to 350 degrees F, with a rack placed in the center of the oven. If you’re not using a stone in the oven, a 5-minute preheat is adequate.
  8. Just before baking, use a pastry brush to paint the loaf’s top with egg wash, and then sprinkle with raw sugar.
  9. Bake near the center of the oven for approximately 45 to 50 minutes. Brioche will not form a hard, crackling crust. The loaf is done when it is medium brown and firm. Smaller or larger loaves will require adjustments in resting and baking time.
  10. Remove the brioche from the pan and allow it to cool on a rack before slicing or eating.

Roasted Garlic Bread

Mmmmm…can you almost smell it?  Two whole heads of garlic, roasted, are stirred into this dough, along with some ground flax seeds.  Crusty on the outside and chewy in the center, this bread is delicious on it’s own or dipped in olive oil and balsamic vinegar.
DSC05261
Roasted Garlic Bread
Makes enough for at least four 1-pound loaves.  Don’t be put off by the long instructions—the process is really simple.  Just read through them before beginning so you understand the timing.  From Healthy Bread in Five Minutes a Day by Jeff Hertzberg and Zoe Francois.
2 heads garlic
1/4 cup ground flaxseed
3 1/2 cups spelt flour
4 cups all-purpose flour
1 1/2 tablespoons yeast
1 tablespoon salt
2 tablespoons vital wheat gluten
4 cups lukewarm water
  1. Roasting the garlic:  Wrap the heads in aluminum foil and bake for 45 minutes at 400.  When cool, cut off the tops of the heads and squeeze the roasted garlic out of each clove.  Mash and set aside.
  2. Mix dry ingredients in a large bowl, at least five quarts.  Add water and roasted garlic and stir until flour is completely incorporated.
  3. Cover with lid (not airtight). Allow the mixture to rise at room temperature until it begins to collapse (or at least flattens on the top), approx 2 hours, depending on room temperature, and initial water temperature. Longer rising times, up to 5 hours, won’t harm the result.
  4. You can use a portion of the dough any time after this period. Fully refrigerated dough is less sticky and easier to work with than dough at room temperature.
  5. On Baking Day:   Prepare your loaf pan, tray, or whatever you’re baking it in/on. Sprinkle the surface of your refrigerated dough with flour. Pull up and cut off a large grapefruit-size piece of dough (about 1 lb), using a serrated knife.
  6. Hold the mass of dough in your hands and add a little more flour as needed so it won’t stick to your hands. Gently stretch the surface of the dough around to the bottom on all 4 sides, rotating the ball a quarter-turn as you go. Most of the dusting flour will fall off – that’s fine, it isn’t meant to be incorporated. The bottom of the loaf may appear to be a collection of bunched ends, but it will sort itself out during resting and baking.
  7. The correctly shaped final product will be smooth and cohesive. The entire process should take no more than 30 – 60 seconds.   If you’d like a baguette, gently form and stretch the dough into an oblong shape.
  8. Rest the loaf and let it rise in the pan, on the tray/pizza peel, for about 40 minutes (if using fresh dough) or up to 90 minutes for refrigerated dough.  Depending on the age of the dough, you may not see much rise during this period. That’s fine, more rising will occur during baking.
  9. Twenty minutes before baking, preheat the oven to 450°F Place an empty broiler tray for holding water on any other shelf that won’t interfere with the rising bread.  (optional—makes a crisp crust)
  10. Dust the top of the loaf liberally with flour, which will allow the slashing knife to pass without sticking. Or, instead brush the dough with water or beaten egg and sprinkle with sesame or poppy seeds (or both).  Slash a quarter inch deep cross, diagonal lines, or tic-tac-toe pattern on top using a serrated knife.
  11. After a 20 min preheat you’re ready to bake, even though the oven thermometer won’t be at full temperature yet. Put your loaf in the oven (use a baking stone if you have one). Pour about 1 cup of hot water (from the tap) into the broiler tray and close the oven to trap the steam.
  12. Bake for about 30 minutes, or until the crust is nicely browned and firm to the touch.  Cool before slicing for best texture.
  13. Store the rest of the dough in the fridge in your lidded (not airtight) container and use it over the next 14 days. The flavor and texture improves, becoming like sourdough. Even 24 hours of storage improves the flavor.  Makes enough dough for at least four 1-pound loaves.

Buckwheat Bread

This bread is one of my favorites.  I love the texture of the buckwheat.  Even with all the whole grains, it’s still soft and tender.  Great with soup!DSC05258
Buckwheat Bread Makes enough for at least four 1-pound loaves.  Don’t be put off by the long instructions—the process is really simple.  Just read through them before beginning so you understand the timing.  From Healthy Bread in Five Minutes a Day by Jeff Hertzberg and Zoe Francois.

1/2 cup buckwheat groats
1 cup buckwheat flour
2 cups all-purpose flour
4 cups whole wheat flour
1 1/2 tablespoons yeast
1 tablespoon salt
1/4 cup vital wheat gluten
4 1/2 cups lukewarm water
  1. Soak the groats in 1 cup of the lukewarm water for 30 minutes.
  2. Wisk together all dry ingredients in a large bowl (at least 5 quarts).  Add the groats, including the soaking water, and the remaining 3 1/2 cups water, and mix well until all flour is incorporated.
  3. Cover with lid (not airtight). Allow the mixture to rise at room temperature until it begins to collapse (or at least flattens on the top), approx 2 hours, depending on room temperature, and initial water temperature. Longer rising times, up to 5 hours, won’t harm the result.
  4. You can use a portion of the dough any time after this period. Fully refrigerated dough is less sticky and easier to work with than dough at room temperature.
  5. On Baking Day:   Prepare your loaf pan, tray, or whatever you’re baking it in/on. Sprinkle the surface of your refrigerated dough with flour. Pull up and cut off a large grapefruit-size piece of dough (about 1 lb), using a serrated knife.
  6. Hold the mass of dough in your hands and add a little more flour as needed so it won’t stick to your hands. Gently stretch the surface of the dough around to the bottom on all 4 sides, rotating the ball a quarter-turn as you go. Most of the dusting flour will fall off – that’s fine, it isn’t meant to be incorporated. The bottom of the loaf may appear to be a collection of bunched ends, but it will sort itself out during resting and baking.
  7. The correctly shaped final product will be smooth and cohesive. The entire process should take no more than 30 – 60 seconds.   If you’d like a baguette, gently form and stretch the dough into an oblong shape.
  8. Rest the loaf and let it rise in the pan, on the tray/pizza peel, for about 40 minutes (if using fresh dough) or up to 90 minutes for refrigerated dough.  Depending on the age of the dough, you may not see much rise during this period. That’s fine, more rising will occur during baking.
  9. Twenty minutes before baking, preheat the oven to 450°F Place an empty broiler tray for holding water on any other shelf that won’t interfere with the rising bread.  (optional—makes a crisp crust)
  10. Dust the top of the loaf liberally with flour, which will allow the slashing knife to pass without sticking. Or, instead brush the dough with water or beaten egg and sprinkle with sesame or poppy seeds (or both).  Slash a quarter inch deep cross, diagonal lines, or tic-tac-toe pattern on top using a serrated knife.
  11. After a 20 min preheat you’re ready to bake, even though the oven thermometer won’t be at full temperature yet. Put your loaf in the oven (use a baking stone if you have one). Pour about 1 cup of hot water (from the tap) into the broiler tray and close the oven to trap the steam.
  12. Bake for about 30 minutes, or until the crust is nicely browned and firm to the touch.  Cool before slicing for best texture.
  13. Store the rest of the dough in the fridge in your lidded (not airtight) container and use it over the next 14 days. The flavor and texture improves, becoming like sourdough. Even 24 hours of storage improves the flavor.

Wednesday, October 13, 2010

Quinoa Bread

DSC05231


Quinoa Bread

Makes enough for at least four 1-pound loaves.  Don’t be put off by the long instructions—the process is really simple.  Just read through them before beginning so you understand the timing.  From Healthy Bread in Five Minutes a Day by Jeff Hertzberg and Zoe Francois.

3 cups white whole wheat flour
3 1/2 cups all-purpose flour
1 cup quinoa, uncooked
1 1/2 tablespoons yeast
1 tablespoon salt
1/4 cup vital wheat gluten
3 3/4 cups lukewarm water

  1. Mix all ingredients together in a large bowl (at least 5 quart) until flour is well combined.  The dough will be wet and won’t form into a ball, but if it seems too sticky, add a little more flour (1/4 c at most).  You’re finished when everything is uniformly moist, without dry patches. It takes a few minutes, and will yield a dough that is wet and loose enough to conform to the shape of its container.
  2. Allow to rise. Cover with lid (not airtight). Allow the mixture to rise at room temperature until it begins to collapse (or at least flattens on the top), approx 2 hours, depending on room temperature, and initial water temperature. Longer rising times, up to 5 hours, won’t harm the result.
  3. You can use a portion of the dough any time after this period. Fully refrigerated dough is less sticky and easier to work with than dough at room temperature.
  4. On Baking Day:
  5. Prepare your loaf pan, tray, or whatever you’re baking it in/on. Sprinkle the surface of your refrigerated dough with flour. Pull up and cut off a large grapefruit-size piece of dough (about 1 lb), using a serrated knife.
  6. Hold the mass of dough in your hands and add a little more flour as needed so it won’t stick to your hands. Gently stretch the surface of the dough around to the bottom on all 4 sides, rotating the ball a quarter-turn as you go. Most of the dusting flour will fall off – that’s fine, it isn’t meant to be incorporated. The bottom of the loaf may appear to be a collection of bunched ends, but it will sort itself out during resting and baking.
  7. The correctly shaped final product will be smooth and cohesive. The entire process should take no more than 30 – 60 seconds.   If you’d like a baguette, gently form and stretch the dough into an oblong shape.
  8. Rest the loaf and let it rise in the pan, on the tray/pizza peel, for about 40 minutes (if using fresh dough) or up to 90 minutes for refrigerated dough.  Depending on the age of the dough, you may not see much rise during this period. That’s fine, more rising will occur during baking.
  9. Twenty minutes before baking, preheat the oven to 450°F Place an empty broiler tray for holding water on any other shelf that won’t interfere with the rising bread.  (optional—makes a crisp crust)
  10. Dust the top of the loaf liberally with flour, which will allow the slashing knife to pass without sticking. Or, instead brush the dough with water or beaten egg and sprinkle with sesame or poppy seeds (or both).  Slash a quarter inch deep cross, diagonal lines, or tic-tac-toe pattern on top using a serrated knife.
  11. After a 20 min preheat you’re ready to bake, even though the oven thermometer won’t be at full temperature yet. Put your loaf in the oven (use a baking stone if you have one). Pour about 1 cup of hot water (from the tap) into the broiler tray and close the oven to trap the steam.
  12. Bake for about 30 minutes, or until the crust is nicely browned and firm to the touch.  Cool before slicing for best texture.
  13. Store the rest of the dough in the fridge in your lidded (not airtight) container and use it over the next 14 days. The flavor and texture improves, becoming like sourdough. Even 24 hours of storage improves the flavor.

Quick Pizza

This pizza really is quick if you’ve got a batch of dough in the fridge.  When I made this during the cooking class, I used the 100% Whole Wheat with Olive Oil recipe, but the Master Recipe works great, too.

I used a grapefruit-sized ball of dough, and floured it so it wouldn’t stick to my hands.  I floured my pizza peel well, then rolled the dough onto it.  It’s a flexible dough and it stretches pretty easily, even when cold.  I drizzled olive oil on the dough, then sprinkled with chopped tomatoes, diced onion, salt and pepper, Italian seasoning, mozzarella, and feta.
Bake for 8-10 minutes in a pre-heated oven, 450-500 degrees.  I used a pizza stone to get a crispy, chewy crust.  The picture above is not the pizza we made in class—that one was gone before I remembered to take a picture.  I borrowed this picture from here.  Look at the roasted butternut squash on top—that’s one of my very favorite vegetables.  I’ll be making this version soon!